link me!

CT!


Selling at!


Stormlight on FB
oh, the places you'll go!


my PSP homes


Monday, April 20, 2015
NOTE: you MAY link to this tut. you MAY print it out for later use offline. you MAY NOT claim it as yours or take anything else from it. this tutorial is ©Ruby/Stormlight, written April 20, 2015.
Supplies needed:
-- PSP
-- main tube of choice. I am using Penelope by Souldesigner. You can purchase her at S&CO.)
-- scrap kit of choice (I used the made to match kit "Cool" by Bibi's Collection. you can get this kit here.)
-- template of choice. I'm using FB template #19 by Millie. Check out her blog for her great selection of FB cover templates.
-- the plugins Visman and Alien Skin 2 Xenofex.
-- font of choice. I used GEOffshoreCaps.
Now, let's create!
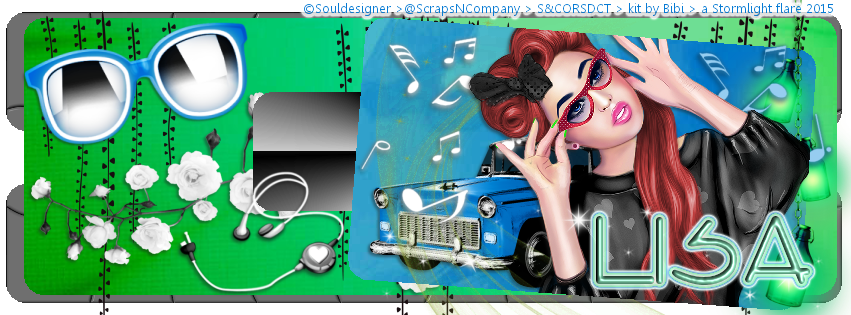
Cover:
1. Open template, duplicate, close original and save as a new canvas. Delete the word art and clovers (layers 5, 6, and 7).
2. Choose two papers from your kit. Click your magic wand outside layer 4 of the template and paste in one of your papers. Hit your delete key, then deselect. Repeat this step with your other paper and layer 2.
3. Select layer 3 with your magic wand. Floodfill with a dark color from your tube. In your plugins menu, go to VM Extravaganza > Heightline and apply the following settings:

4. Select layer 1 with your magic wand. Floodfill with a lighter color from your tube. In your plugins menu, go to Alien Skin Xenofex 2 > Puzzle and apply the default settings.
5. Paste in your tube. Resize as needed and apply basic drop shadow. Move to the right hand side of your cover on top of layer 4. Select layer 4 and click outside with magic wand. Return to tube layer and hit delete key. Deselect.
6. Time to get your elements on! Numbers/names apply to the scrap kit I'm using so if you're using a different one, use the elements of your choice. All elements are resized with the smart size setting. Remember to apply Jazzy's basic drop shadow after each element is placed unless otherwise marked:
43 (rose blooms) - 50%. drop down to under layer 3.
116 (car) - 25%. place under tube layer.
127 (vines) - place along top edge of cover and drop under rose blooms layer. NO drop shadow.
87 (chain lights) - 35%. place just to right of tube on far right side.
11 (swirl of colored light) - place above car layer but behind tube. NO drop shadow.
89 (sunglasses) - 75%. place in upper left corner of cover.
75 (earbuds) - 55%. place just below sunglasses.
74 (music notes) - 65%. duplicate this layer. colorize one copy with a bright color from your tube or kit. place these at your preference.
92 (sparkle trail) - place along bottom of tube. NO drop shadow.
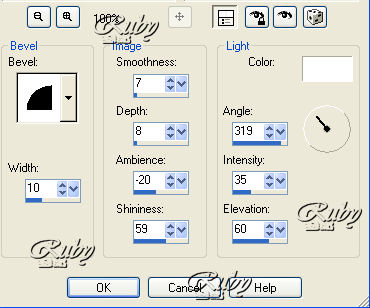
7. Create a new raster layer for your name. Type your name and place it to your liking. In your effects menu, go to 3D effects > inner bevel and apply the following settings:
8. In your plugins menu, go to Eye Candy > Gradient Glow and apply the following settings to your name:

9. Create
a new layer for your copyright/watermark and add it on along the top.
*Remember that you cannot use urls on Facebook due to their rules, so
the next best alternative is to credit the artist's or store's FB page -
for S&CO tubes, I would put @ScrapsNCompany*
10. Delete the black square that marks the profile photo area.
Profile Photo:
1. Open a new canvas, 180x180. Copy paper of choice and paste into canvas.
2. Copy the rose blooms and the chain lights from your cover and arrange them on the canvas to your liking. Resize chain lights 60%.
3. Paste tube into canvas. Resize 65% and move to opposite side from chain lights.
4. Copy the light swirl and sparkle elements from your cover and paste over tube.
5. Copy and paste in music notes. Resize 40% and paste in lower right corner.
6. Create a new raster layer and floodfill with a color from your tube or kit. Click your magic wand inside the layer and go to selections > modify > contract by 5. Hit your delete key. Repeat step 7's inner bevel directions to give the border definition.
7. Repeat steps 7-9 from banner directions for your initial and copyright.

Subscribe to:
Post Comments
(Atom)
CU licenses


0 comments:
Post a Comment