link me!

CT!


Selling at!


Stormlight on FB
oh, the places you'll go!


my PSP homes


Sunday, March 23, 2014
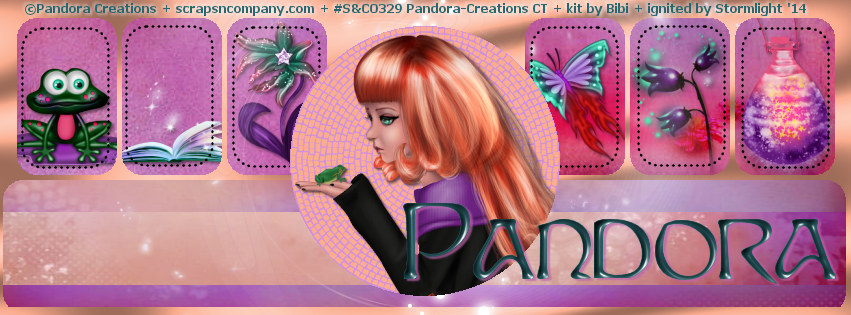
NOTE: you MAY link to this tut. you MAY print it out for later use offline. you MAY NOT claim it as yours or take anything else from it. this tutorial is ©Ruby/Stormlight, written February 14, 2014.
Supplies needed:
-- PSP
-- main tube of choice (I used Pandora's sweet tube "Make A Wish", available at S&CO.)
-- made-to-match scrap kit by Bibi's Collection of the same name, also available at S&CO.
-- template of choice. (Millie has tons of great Facebook cover templates. check out her blog for the selection! for this tut, I chose cover template #45)
-- the plugins Tramages (Mo' Jellyfish), Xenofex (Classic Mosaic), and EyeCandy 4000 (Bevel Boss).
-- the plugins Tramages (Mo' Jellyfish), Xenofex (Classic Mosaic), and EyeCandy 4000 (Bevel Boss).
-- Jazzy's "basic" drop shadow setting of 2, 2, 50, 3 and color black.
-- font of choice. I used Sprite.
-- font of choice. I used Sprite.
1. Open template, duplicate, close original and save this as your new canvas. Delete CR layer.
2. Select the background layer. Choose a color from your tube and flood the background layer. In your plugins menu, go to Tramages > Mo' Jellyfish and use the following settings: Tile Size - 15, Offset - 102, Shading - 95.
3. Select layer 3. Choose a paper from your kit (if using the same Bibi kit, I chose paper8) and paste onto canvas. (You may need to use raster deform to stretch the paper depending on paper size.) Position the paper to your liking and return to layer 3, click your magic wand. Then go to selections > invert and hit your delete key. Lastly, delete the original shape layer underneath.
4. Select layer 4, then repeat step 3. You can use the same paper but position it differently (this is what I did) or another paper.
5. Select layers 1 and 2 (the sets of three rounded rectangles) and repeat step 3. This time, I used paper 2. Merge these layers together.
6. Select the center circle. Floodfill with the same color from your tube as before. In your plugins menu, go to Alien Skin Xenofex > Classic Mosaic and apply the following settings:

8. Time for some elements. Numbers apply to the scrap kit I'm using so if you're using a different one, use the elements of your choice. All elements are resized with the smart size setting. Remember to apply Jazzy's basic drop shadow after each element is placed unless otherwise marked:
4 (frog) - 40%
13 (book) - 35%
53 (flower with star center) - 30%
66 (flaming butterfly) - 45%
11 (tulips) - 55%
54 (faerie potion) - 40%
Position the above chosen elements on the six rounded rectangles. Use your magic wand and repeat step 3 to cut away the excess. Merge these layers together and move them below layers 5 and 6 (the dotted frames).
9. [optional/if needed] Use your eraser tool to erase any bits of the elements that overlapped into the rectangles of others.
10. Select your elements layer and paste in two sparkle elements of your choice from your kit (I used elements 99 and 10).
11. Create a new raster layer for your name. Type your name and position it to your liking. In your plugins menu, go to EyeCandy 4000 > Bevel Boss and use the preset Inner Carve, default settings.
12. Apply Jazzy's basic drop shadow, but up the opacity to 70% and change the color to a color from your tube or kit.
13. Create a new raster layer for your copyright/watermark and add it on. Save as png.
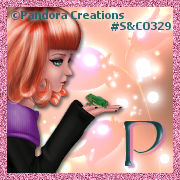
Profile Photo:
1. Open a new canvas, 180x180. Copy background and one of the sparkle layers from the cover, paste into canvas.2. Paste a new copy of tube into canvas. You can resize and position how you like. Remember to give her a drop shadow!
3. Paste a new copy of one of your elements into the canvas. Position it how you like, then drop it below the sparkle layer. [optional] In your layers palette, change the blend layer to dodge and drop the opacity to 66%.
4. Create new raster layer, floodfill with a color from your tube or kit. Selections > modify > contract by 7, hit delete.
5. go to Adjust > Add/Remove Noise > Add Noise with the settings 47%, gaussian, monochrome CHECKED.
6. Repeat steps 12 and 13 from the cover directions for your initial and copyright.
Subscribe to:
Post Comments
(Atom)
CU licenses


0 comments:
Post a Comment