link me!

CT!


Selling at!


Stormlight on FB
oh, the places you'll go!


my PSP homes


Sunday, August 4, 2013
NOTE: you MAY link to this tut. you MAY print it out for
later use offline. you MAY NOT claim it as yours or take anything else from it.
this tutorial is ©Ruby/Stormlight, written August 4, 2013.
Supplies needed:
-- PSP
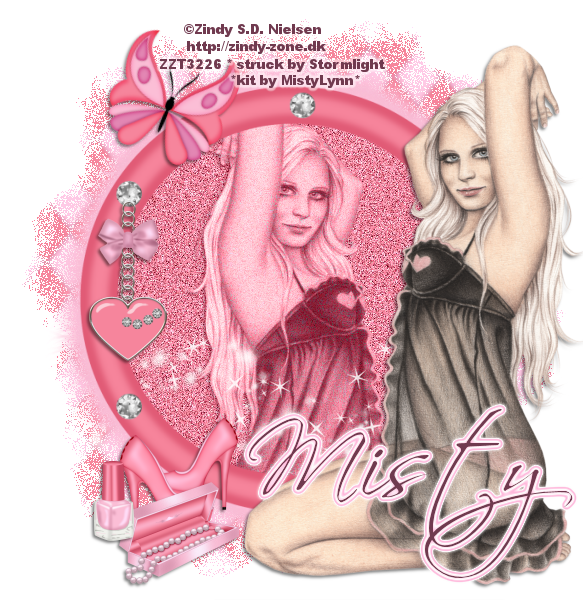
-- main tube of choice (I used a lovely pinup by Zindy. You MUST have a license to use Zindy's work and can get lots of great tubes from her here.)
-- scrap kit "Love Shy" by MistyLynn. you can purchase this gorgeous kit here.
-- the plugin
EyeCandy 4000
-- Jazzy's "basic" drop shadow setting of 2, 2, 50, 3 and color black.-- mask of choice. i used a mask by WeeScotsLass--check out her blog for tons of great ones.
-- font of choice. I used Scriptina.
1. Open Frame02, duplicate, close original. Save the copy as a new file.
2. Paste in your tube. Position it outside the frame on right hand side.
Duplicate tube, move copied layer under frame.
Mirror the copy so it faces the opposite way. Click your magic wand inside frame, selections > modify > expand > expand
by 7. Invert, return to tube layer and hit your delete key.
3. Paste in your first paper of choice.
Repeat magic wand step from step two. Drop this layer to the bottom.
4. Return to tube copy layer. In your layer palette, change blend mode to luminance legacy and lower opacity to 68.
5. Paste in your second paper of choice as the bottom layer. Apply mask.
6. Merge mask group in your layer palette. Change mask's blend mode to dissolve, lower opacity to 82.
7. Time to get out those elements! All elements are
resized with the smart size setting. Remember to apply Jazzy's basic drop shadow
setting after each element is placed unless otherwise indicated:
Sparkle02 - place under frame (NO drop shadow)
Butterfly03 - 40%, rotate 20 degrees right.
Charm - 40%, hang from frame
Polish - 20%
Shoes - 30%
Pearl box - 30%
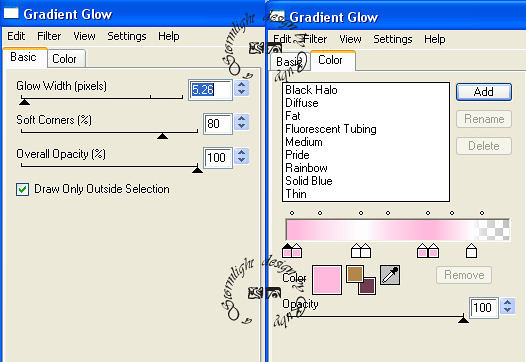
8. Create a new raster layer for your name and add it on. Go to your plugins menu and select EyeCandy's Gradient Glow with the following settings:
Subscribe to:
Post Comments
(Atom)
CU licenses


0 comments:
Post a Comment