link me!

CT!


Selling at!


Stormlight on FB
oh, the places you'll go!


my PSP homes


Thursday, September 4, 2014

NOTE: you MAY link to this tut. you MAY print it out for later use offline. you MAY NOT claim it as yours or take anything else from it. this tutorial is ©Ruby/Stormlight, written August 31, 2014.
Supplies needed:
-- PSP
-- main tube of choice (I used Suniel by Pandora Creations. You can purchase her at S&CO.)
-- template of choice. I used a template by Designz by Ali.
-- textures of choice, at least three. I used textures by devianttales and Aqua.
-- the default gradient "Duotone light blue" (or a gradient of your choice whose colors go with your tube).
-- the plugins Mura Meister Clouds, Visman (Stardust) and Lokas Gel.-- textures of choice, at least three. I used textures by devianttales and Aqua.
-- the default gradient "Duotone light blue" (or a gradient of your choice whose colors go with your tube).
-- Jazzy's "basic" drop shadow setting of 2, 2, 50, 3 and color black.
-- mask of choice. I used a mask by zuzzanna.
-- font of choice. I used A&S Snapper.
And now let's create!
1. Open template, duplicate, close original and save duplicate as your canvas.
2. Choose your first texture and paste it into the bottom of your canvas. Apply mask. Merge group. NOTE - if using a mask like Zuzzanna's, you will need to check the box marked "invert transparency" when applying the mask so that you get the mask pattern and not a cutout.
3. Paste in your tube. If the main area of the template has a frame, drop your tube below the frame. Resize if your tube is large (I resized 50% bicubic), duplicate and hide the copy. Position to your liking. Apply Jazzy's drop shadow to your first tube ONLY.
4. Click your magic wand on the frame's outside. Modify > selections > expand > expand by 3. Return to tube layer and hit your delete key.
5. In your color palette, select your gradient. Floodfill the main area of your template below your tube.
6. Create a new raster layer. In your plugins menu, go to Mura Meister > Cloud and use a setting whose colors match your gradient/tube (I am using the default setting of wispy white clouds on a blue sky). Repeat step 4 on this layer.
7. Return to your tube layer. In your layer palette, set the opacity to 77% and the blend mode to burn.
8. Unhide your tube copy and move it above the frame layer. Resize as needed (I resized 35% bicubic as I'm using an extremely large tube). Position as you like on your canvas.
9. Go to 3D effects > Illumination > Sunburst and use the following settings:

10. Click on your frame layer. Floodfill with a color from your tube and add some light noise to it.
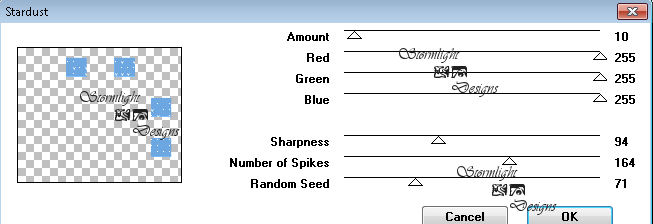
11. If your template has small shapes like mine, floodfill them with a color or colors from your tube. In your plugins menu, go to VM Natural > Stardust and use the following settings:
12. Create a new raster layer. Type your name and position it to your liking. In your plugins menu, go to Lokas Gel and apply the following settings:

13. Apply Jazzy's drop shadow, but change the color to a contrasting color from your tube.
14. Create a new layer for your copyright/watermark and add it on. Use a small font, such as Arial Narrow at 9/10 point.
Subscribe to:
Post Comments
(Atom)
CU licenses


0 comments:
Post a Comment