link me!

CT!


Selling at!


Stormlight on FB
oh, the places you'll go!


my PSP homes


Friday, May 4, 2018
NOTE: you MAY link to this tut. you MAY print it out for later use offline. you MAY NOT claim it as yours or take anything else from it. this tutorial is ©Ruby/Stormlight, written May 3, 2018.
Supplies needed:
-- PSP
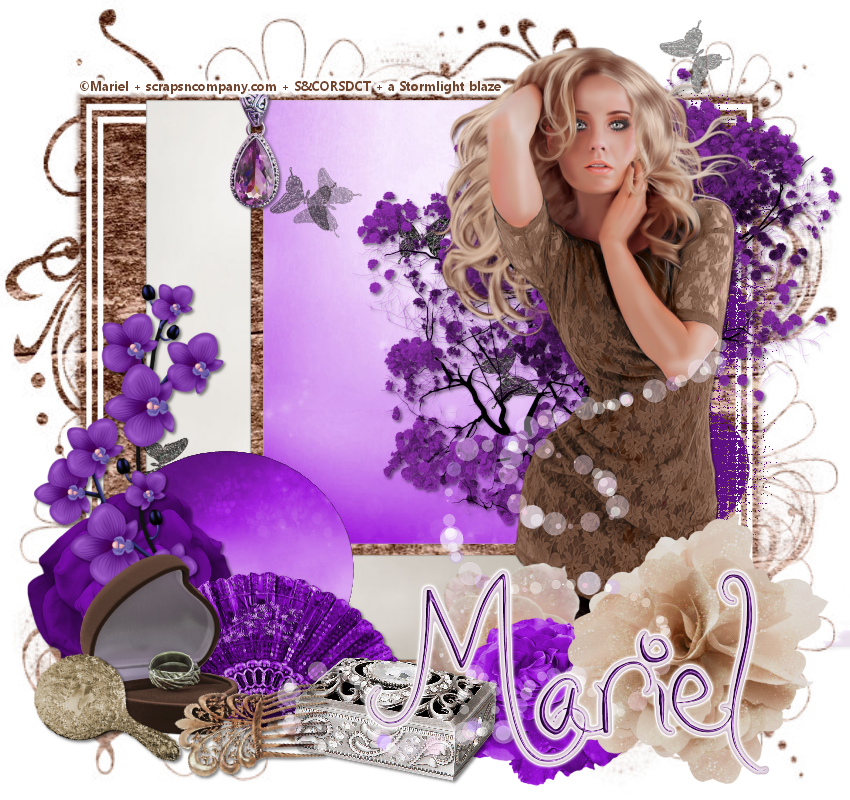
-- main tube of choice. I am using "Sensual" by Mariel. You can purchase her here.
-- scrap kit of choice. I am using the match kit also created by Mariel, which you can get here.
-- template of choice. I am using a template by Ali.
-- mask of choice. I am using a mask by zuzzanna.
-- the plugin Eye Candy.
-- font of choice. I am using Like Giselle.
1. Open your template, duplicate and close the original. Save copy as your new canvas. Delete any creator/copyright layer.
2. Select 3 papers from your kit and paste into canvas. Duplicate one of your papers. Move darkest colored/patterned paper to the bottom and hide for later.
3. Select the layer labeled "middle frame" and place one of your copies of the duplicated paper above it. Select all > float > defloat > invert, then return to paper and hit delete key. Repeat this step with the other copy of that paper on the big circle layer.
4. Merge the two small rectangles into one layer. Select your third paper and place above the rectangles. Repeat step 3.
5. Merge the three small circles into one layer. Using manual color correction, change them to a dark color from your tube or kit. In effects menu, go to texture effects > Antique Mosaic and use the "grid small" preset.
6. Paste in your tube and apply drop shadow. Resize if needed.
7. Now let's add some elements. Numbers/names apply to the scrap kit I'm using so if you're using a different one, use the elements of your choice. All elements are resized with the smart size setting. Any directions for placement of elements are optional - you can follow my placements or place where preferred. Remember to apply basic drop shadow after each element is placed unless otherwise marked:
9, 13, 39, 40 (flowers) - 40%.
38 (flower branch) - 60%.
15 (jewel pendant) - 20%.
27 (ring box) - 30%.
10 (fan) - 50%.
64 (hair comb) - 45%.
66 (mirror) - 50%.
90 (flowering tree) - 60%. place behind tube.
82 (jewel box) - 65%.
two accents of choice - NO drop shadow. place one as top layer and one below tube.
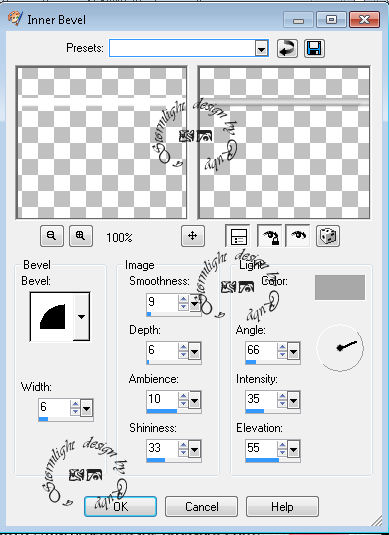
8. Create a new raster layer for your name. Type your name and position to your liking. [optional] go to Inner Bevel and apply the following settings:
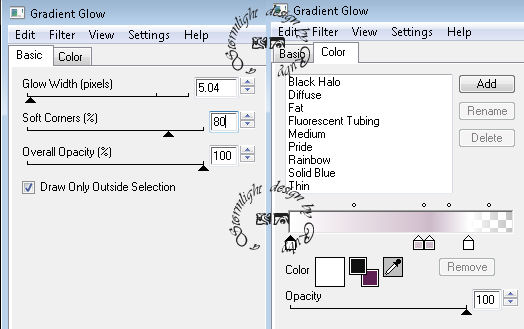
9. In plugins menu, go to Eye Candy > Gradient Glow and apply these settings:
10. Create new raster layer for your copyright and watermark.
Subscribe to:
Post Comments
(Atom)
CU licenses


0 comments:
Post a Comment