Powered by Blogger.
me!
girl. desert dweller who loves snow and prefers winter. owned by a regal Snowshoe. proud auntie of four amazing children who will some day rule the world ;) unashamed Trekkie, Questie, Browncoat, 'Scaper and (mostly) all-around sci-fi fangirl. bookworm extraordinaire. amateur colorist. flaming history geek. major PSP addict.
link me!

Stormlight on FB
are you following me? ;)
Tuesday, April 3, 2018
12:40 PM | Edit Post
NOTE: you MAY link to this tut. you MAY print it out for later use offline. you MAY NOT claim it as yours or take anything else from it. this tutorial is ©Ruby/Stormlight, written April 2, 2018.
Supplies needed:
-- PSP
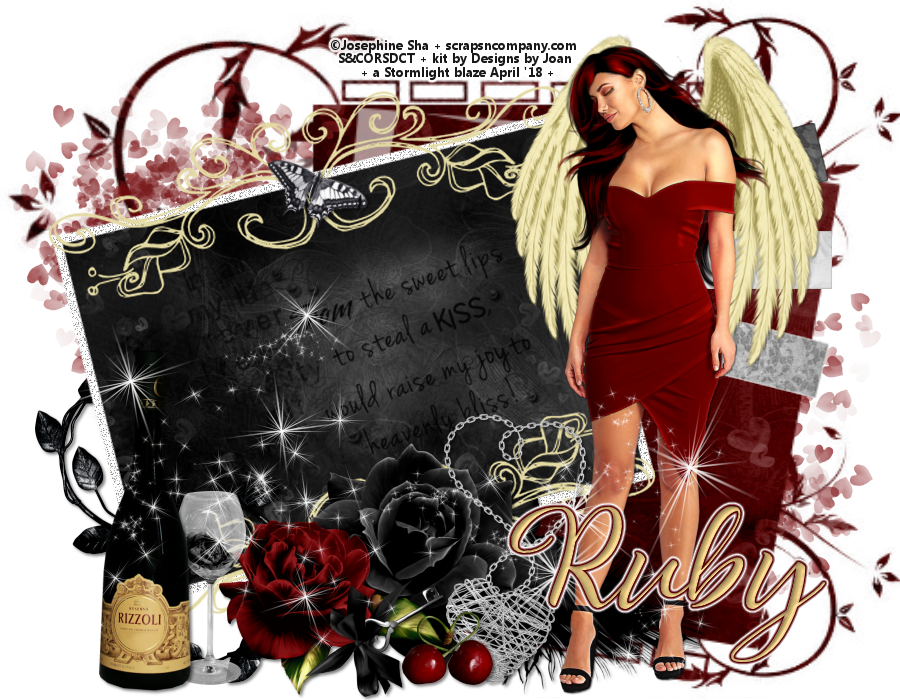
-- main tube of choice. I am using "Red Dream" by Josephine Sha. You can purchase her here.
-- scrap kit of choice. I am using "Heart Breaker" by Joan, which you can get here.
-- template of choice. I am using a template by Ali.
-- mask of choice. I am using a mask by Ciara from the Soonerbelle MSN forum.
-- the plugin Eye Candy.
-- font of choice. I am using Rachella Script.
1. Open your template, duplicate and close the original. Save copy as your new canvas. Delete any creator/copyright layer.
2. Open four papers and paste into canvas. Send one paper to bottom and hide for now. Select darkest paper and move above the large center rectangle. Select all > float > defloat > invert and select paper, then hit delete key. Repeat with other papers and the thin rectangles on the right.
3. Select rectangular frame. Add noise with the following settings: random, 67%, monochrome CHECKED.
4. Paste in your tube and resize if needed. Place on right hand side and apply drop shadow.
5. Unhide bottom paper. apply mask and merge group.
6. [optional] Select the scrolled decorations layer and use manual color correction to change it to a light color from your tube/kit.
7. Now let's add some elements. Numbers/names apply to the scrap kit I'm using so if you're using a different one, use the elements of your choice. All elements are resized with the smart size setting. Any directions for placement of elements are optional - you can follow my placements or place where preferred. Remember to apply basic drop shadow after each element is placed unless otherwise marked:
15 (necklace) - 40%.
7, 17, 19, 27 (flowers and leaves) - 30-60%.
75 (butterfly) - 20%.
79 (feather) - 35%.
85 (key) - 35%.
62 (glass) - 50%.
98 (wine bottle) - 45%.
108 (cherries) - 30%.
64, 58, 19, 10 (flowers) - 35-55%.
39 (word art) - 55%. rotate 20 degrees left and drop to just above rectangle layers. change blend mode to overlay. NO drop shadow.
4 (heart scatter) - duplicate once and place both copies at random just above mask layer. NO drop shadow.
113 (sparkles) - NO drop shadow.
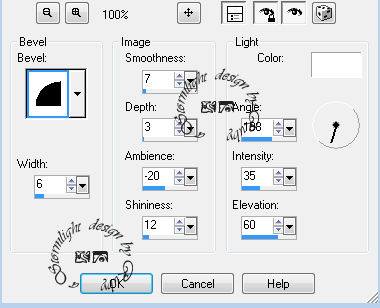
8. Create a new raster layer for your name. Type your name and position to your liking. go to Inner Bevel and apply the following settings:
9. In plugins menu, go to Eye Candy > Gradient Glow and apply these settings:
10. Create new raster layer for your copyright and watermark.
Subscribe to:
Post Comments
(Atom)
Tags
- A Simply Sassy Creation
- A Taggers Scrap
- Abranda Flaminio
- Adam Byrne
- ads
- Aguila Dorado
- AldoDark
- Alec Rud
- Alehandra Vanhek
- Alex Prihodko
- Alfadesire
- Alika's Scraps
- All Dolled Up
- alphas
- Alphas by Sue
- Alpio Stanchi
- Amanda Fontaine
- Amber
- Amy Brown
- Andy Cooper
- Angels and Artists Against Lyme
- AngelWing Scraps
- announcements
- Anthony Guerra
- Arthur Crowe
- Ash Evans
- Attila
- attitude
- Autistic Inspiration
- autumn
- awareness
- AWDesigns
- Barb Jensen
- Bel Vidotti
- Bibi's Collection
- Bitzy Beez Designz
- Black Widow Creationz
- Blissful Designs
- blog trains
- BokhanART
- book quotes
- Cakes Creations
- Carlos Cartagena
- Carpe Diem
- CEI
- CelinArt Pinup
- ChaChaz Creationz
- Cherry Creek Creations
- Chili Designz
- Chris Pastel
- Christmas
- Christmas in July
- cluster frames
- Crazy Carita
- Creative Misfits
- Creative Scraps by Crys
- Cris Ortega
- CSDesigns
- CT
- CU freebies
- CU items
- Cupcake Sprinkles
- Curious Creative Dreams
- Dance In The Rain
- DanielaE Design
- Danny Lee
- Dark Natasha
- Dark Yarrow
- Designs by Ali
- Designs by Claudia
- Designs by Joan
- Designs by Ketura
- Designz by Sue
- Deviant Scraps
- Devilish Dezines
- Di Halim
- Digicats & Dogs
- DigitalScrapbook.com blog train
- DigMom Designs
- Dilara
- Disco Science
- Disturbed Scraps
- DN Scraps
- Doodle by Design
- Eenniizzie
- Einion Rees
- element packs
- Elias Chatzoudis
- Ellen Fox
- Ellie Milk
- Eric Wilson
- Ericka Baque
- Eskada
- Eugene Rzhevskii
- Facebook sets
- fall
- Fantastically Free Blog Train
- Fantasy Moments
- Fiodorova Maria
- forum challenges
- forum sets
- Francis Mary
- freebies
- Freya Longford-Sidebottom
- Friends of Rosegarden
- FTU kits
- FTU scraps
- FwTags Creations
- Gail Gastfield
- Garrett Blair
- Garv
- Gary Rudisill
- Gimptastic Tuts
- Ginnibug Designz
- Goldwasser
- gothic
- Gothique Starr
- Grafik
- GraphFreaks
- Halloween
- Hana Design
- Help For Casper
- Henri Peter
- HorsePlay's Pasture
- House of Dragus
- Hungry Hill Scraps
- Inzpired Creationz
- Irish Princess Designs
- Ishika Chowdhury
- Ismael Rac
- Jamie's Creations
- Janah Irinya
- Jane Donskih
- Jane Starr Weils
- Jef Caudle
- Jenn's Designs
- Jenne
- Jennifer Janesko
- Jenny
- Jessica Galbreth
- JMack
- Joan Pelaez
- Joel Adams' Lilz
- JoJo Creations
- Josephine Sha
- Ju Kirumy
- Julia Fox
- Julia Spiri
- Julsy
- Kai Kreations
- Kajenna
- Kandii Popz Designz
- Karmalized Scraps
- Kate Miller
- Katharine
- KatNKDA
- Kerry's Kreations
- Ketka
- Kirsche
- Kissing Kate
- kits with AI
- kits with tubes
- Kittz Kreationz
- Kizzed by Kelz
- KorneliaROS
- Lady Mishka
- Laguna
- Lee Anne Seed
- LeEVArt
- LegioStudio
- Les Toil
- Lia
- Lil Mz's Brainstorms
- Lindalou Creations
- linkage
- links
- lissful Designs
- Lizquis Scraps
- Luscious Ladee
- Lysisange
- Macy's Posers
- Marie Lu
- Mariel Design
- Marilyn Allen
- MaryArt
- masks
- match kits
- Matt Hughes
- Mel-S Creations
- Melissa Dawn
- Melissaz Creationz
- Michael Landefeld
- Michele-lee Phelan
- Michelle's Myths
- Millie's PSP Madness
- Misfits
- Misticheskaya
- MistyLynn Creations
- MizTeeques Scraps
- Monti's Pixel Playground
- MS Creations
- my kits
- Myka Jelina
- Mysterfeerie Creations
- NataliaNZ
- Nedda Shishegar
- Nene Thomas
- Neoracer
- New Year's
- Nick Deligaris
- Niqui's Designs
- NitWit Collections
- NKDesign
- no scraps
- Nocturne
- Oky Draft Art
- OrkusArt
- overlays
- Pam's Scraps
- Pammy's Welt
- Pampered Pups Blog Train
- Pandora Creations
- paper packs
- Passion 4 Scrapz
- posers
- PTU clusters
- PTU kits
- PTU scraps
- PU
- QTags by Suzie Q
- Queen Uriel
- quick pages
- quick tuts
- Rachael Huntington
- retired kits
- Rieneke Designs
- Rion Vernon's PinUp Toons
- RJ/Dazzarrific
- Rockin's Ruckus
- Roman Zaric
- Roo
- Rosalys
- Runswithwind
- S&CO collabs
- Saga Totem
- Sandra Charlet
- Sara Moon
- Savage Dezines
- Savage Dezines Exclusive
- Scraparoni by Toni
- ScrapItStudio
- Scrappin With Lil Ole Me
- Scrapping Your Heart Out blogtrain
- Scrappy Expressions/Sentimental Style
- Scraps by DonnaW
- Scraps by Susan
- Scraps Dimensions
- ScrapzNPleasure
- Seachell
- Selina Fenech
- Selisan Al-Gaib
- Sensual Posers
- Serenity Sheri
- SheoKate
- show-off
- Sirens Secrets
- Skyscraps Pinup
- snags
- Snowbunny
- Sophisticated Scraps
- Souldesigner
- spring
- squee
- St. Patrick's Day
- Stacey Sharp
- Stan Dudin
- Starlite and Soul
- Starry Night Designz
- StellaFelice
- summer
- Summertime Designs
- Suzanne Woolcott
- Tagcatz Design
- Tammara Markegard
- Tammy's Welt
- Tarya
- Tasha's Playground
- Tessa Leigh Heinemann
- The Hunter
- theme: attitude
- theme: autumn
- theme: beach
- theme: cats
- theme: celestial
- theme: Christmas
- theme: dessert
- theme: dreamy
- theme: dudes/guys
- theme: fantasy
- theme: floral
- theme: girly
- theme: gothic
- theme: Halloween
- theme: ocean/sea
- theme: romantic
- theme: sexy
- theme: soft
- theme: spring
- theme: steampunk
- theme: summer
- theme: Valentine's Day
- theme:elegance
- theme:girls/women
- theme:gothic
- theme:Halloween
- theme:party
- theme:spring
- theme:winter
- Tiffany Toland-Scott
- Tiny Turtle Designs
- TK Designs
- Tkanaari
- Tony Mauro
- Toriya
- Toxic Desirez
- Trinita
- TU clusters
- Tunchy Art
- tuts
- tuts.Designs by Joan
- Unholy Vault Designs
- Unleashed Scraps
- Vadis
- Valentine's Day
- Valtuzka
- Veleri
- Venomous Designs
- Verymany
- Vi Nina
- Vicki Yeager
- Viket
- Whisper In The Wind
- Wicked Princess
- winter
- word art
- Yuki
- Zebrush
- Zindy S.D. Nielsen
- Zlata M
Past inspirations
My license list
companies:
G.I.L.D.
CILM
CDO
MPT
PTE
MyTA
Pics For Design
Scraps n Company
Scraps and the City
PSP Asylum
Artistic Dreams Imaging
The PSP Project
Artistically Inclined Licensing
EleganceFly
VMArtists
Paper Dolls
Wicked Diabla
All That Glitterz
independent artists/special licenses:
Anthony Guerra Unlimited
Amanda Fontaine limited exclusive
Barbara Jensen
Ismael Rac
Arthur Crowe
Sensual Posers
Elias Chatzoudis
Verymany
Keith Garvey
Kathy Cyr
Vi Nina
Misticheskaya
Queen Uriel
Goldwasser


0 comments:
Post a Comment