link me!

CT!


Selling at!


Stormlight on FB
oh, the places you'll go!


my PSP homes


Monday, May 19, 2014

Supplies needed:
-- PSP
-- main tube of choice (I used Vi Nina's gorgeous Brigitta. She can now be purchased at Nina's store here.)
-- template of choice. (I used a template by Desirena Designs.)
-- mask of choice (I used a mask by weescotslass.)
-- the plugin Visman (VM Natural > Splash).
-- Jazzy's "basic" drop shadow setting of 2, 2, 50, 3 and color black.
-- fonts of choice.
-- fonts of choice.
1. Open up your template, duplicate and close the original. Save the duplicate as your new canvas. Expand canvas to 700x700.
2. Click on layer DD5 and floodfill with a color from your tube. Repeat this with layer DD6 and then merge these two layers together.
3. In your plugins menu, go to VM Natural > Splash! and apply the following settings:

4. Click on layer DD4 and floodfill with a light color (I chose light silver). Repeat with layer DD2 and then merge together.
5. Go to Effects > Texture Effects > Blinds and apply the following settings: width - 8, opacity - 80, color - dark color of choice from tube, light from left/top - CHECKED.
6. Repeat step two with layers DD3 and DD1.
7. Go to Effects > Texture Effects > Mosaic - Glass and apply default settings.
8. Click on DD7 and floodfill with a light color from your tube. Repeat step 3.
9. Click on DD8 and floodfill with a very light color from your tube. Repeat step 3, but change the Ray Lengths to 24 and 80.
10. Click on layer DD9 and floodfill with the same color from the previous step.
11. Select this layer with your magic wand and then go to Effects > Artistic Effects > Balls and Bubbles. Choose "automatic multiple balls or bubbles" and use the default settings.
12. Paste in your tube. Resize if needed (I resized mine to 40% bicubic). Position where you want your tube and apply Jazzy's basic drop shadow. Cut away any excess if needed.
13. Create new raster layer and floodfill with a color from your tube. Apply mask, merge as group, and drop this layer to the bottom.
14. Create another new raster layer. Using one of your fonts, type a word or phrase repeatedly on layer DD9. Click your magic wand on the outside of layer DD9 and hit your delete key to delete any part of the text that overlaps the edge of the layer. Return to the text layer and, in your layer palette, lower the opacity to 30 and blend layer to luminance.
15. Create a new raster layer for your name. Go to Effects > 3D Effects > Inner Bevel and apply the following settings:
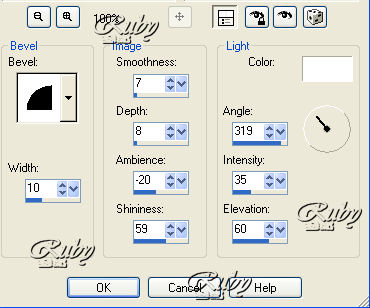
16. Apply Jazzy's basic drop shadow to your name layer.
17. Create a new raster layer and add on your copyright/watermark.
18. If needed, create another new raster layer, floodfill with white and drop to bottom. Crop out any excess white space as needed and save as png.
Subscribe to:
Post Comments
(Atom)
CU licenses


0 comments:
Post a Comment